[Adding the E3D PZ probe to a Voron V0.2 \| Fattylewis.com](https://fattylewis.com/2025/01/15/adding-the-e3d-pz-probe-to-a-voron-v0-2/)
## Why the PZ Probe for bed levelling[](https://fattylewis.com/2025/01/15/adding-the-e3d-pz-probe-to-a-voron-v0-2/#why-the-pz-probe-for-bed-levelling)
In short, space. The V0.2 has a tiny build volume. It has a 120 x 120 x 120mm build volume with enclosure not much bigger. This means the usual way of adding a sensor to the side of the hotend wouldnt work, there just isnt enough space. I also wanted to try and keep as close to the original LDO / Voron design as possible, so that meant keeping the Voron Revo hotend. I also have lots of spares for this hotend so it made sense to keep using it.
## Differences[](https://fattylewis.com/2025/01/15/adding-the-e3d-pz-probe-to-a-voron-v0-2/#differences)
One of the bigger differences between an original Voron design plan and the LDO kit is the addition of the **Picobilical PCB Mod** this also plays a big part in what we are changing here to mount the PZ Probes PCB. This is also the part that i amended to get this working.
## What i changed[](https://fattylewis.com/2025/01/15/adding-the-e3d-pz-probe-to-a-voron-v0-2/#what-i-changed)
There isnt a massive change here, ive just added a PCB mount to [toolhead_spacer_v02.stl](https://github.com/MotorDynamicsLab/LDO-Picobilical/blob/master/STLs/toolhead_spacer_v02.stl) which you can see here:
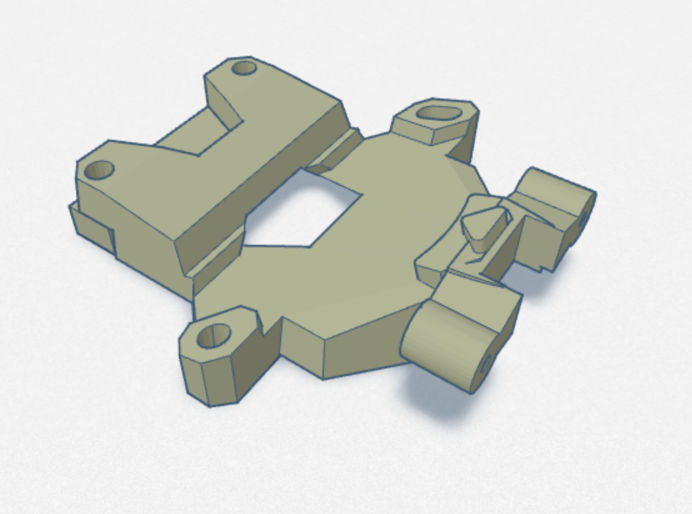
This was done in tinkercad. Im really not a 3D designer and the most i can do really is joining bits together. So im really happy this did work. The file is available here:
[AVAILABLE ON PRINTABLES](https://www.printables.com/model/1149260-ldo-motors-voron-v02-e3d-pz-probe-mount)
This should be a drop in replacement for the original part making install nice and easy.
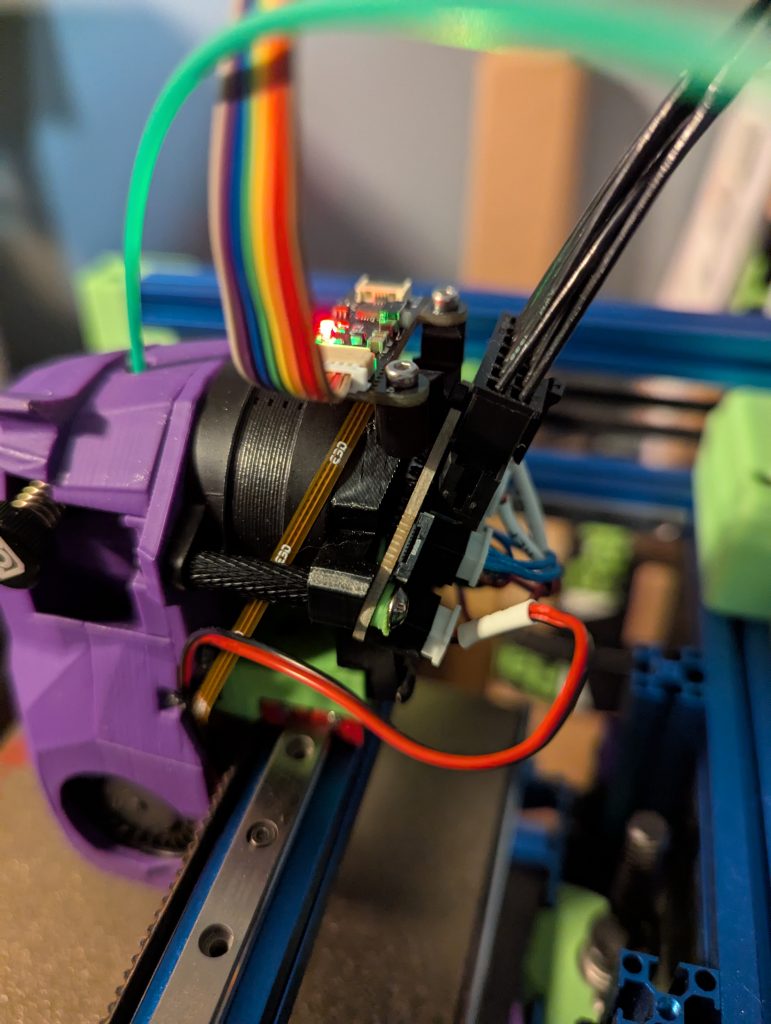
This is the part in place:
## Configuration[](https://fattylewis.com/2025/01/15/adding-the-e3d-pz-probe-to-a-voron-v0-2/#configuration)
This bit took me a little longer to figure out but this does seem to be working.
Firstly, i used the original motherboard that came with my LDO kit which is the **Bigtreetech SKR Pico**.
The port i used on the mainboard was E0-STOP shown here:
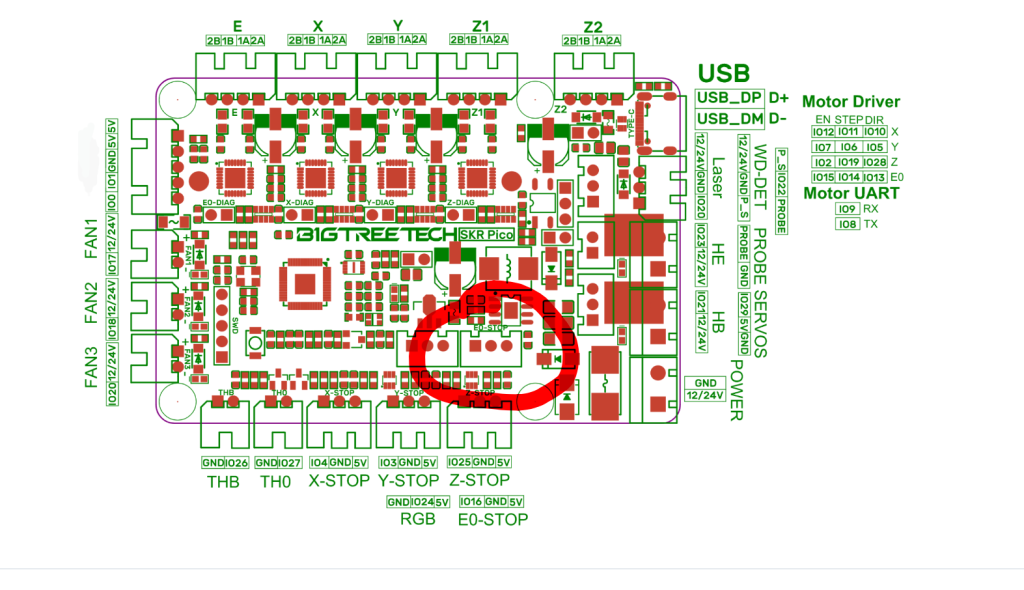
You must use 5v power for it!
## printer.cfg[](https://fattylewis.com/2025/01/15/adding-the-e3d-pz-probe-to-a-voron-v0-2/#printercfg)
This is the relevant section from my printer.cfg:
`| | | |---|---| ||#####################################################################<br># CUSTOM!!!!!<br># PZ Probe<br>[probe] ## Other parameters in config.cfg<br>pin: !gpio16<br>x_offset: 0.0<br>y_offset: 0.0<br>#z_offset: 0.0<br>speed: 5.0 # Speed (in mm/s) of the Z axis when probing. The default is 5mm/s.<br>samples: 2<br>sample_retract_dist: 3.0<br>samples_tolerance_retries: 1<br>lift_speed: 10<br>activate_gcode:<br> G4 P200 ;Wait 200ms<br> SET_TMC_CURRENT STEPPER=stepper_z CURRENT=0.4<br># SET_TMC_CURRENT STEPPER=stepper_z1 CURRENT=0.4<br># SET_TMC_CURRENT STEPPER=stepper_z2 CURRENT=0.4<br># SET_TMC_CURRENT STEPPER=stepper_z3 CURRENT=0.4<br>deactivate_gcode:<br> {% set run_current = printer.configfile.config['tmc2209 stepper_z'].run_current \| float %} <br> SET_TMC_CURRENT STEPPER=stepper_z CURRENT={run_current}<br># SET_TMC_CURRENT STEPPER=stepper_z1 CURRENT={run_current}<br># SET_TMC_CURRENT STEPPER=stepper_z2 CURRENT={run_current}<br># SET_TMC_CURRENT STEPPER=stepper_z3 CURRENT={run_current}<br><br>[bed_mesh]<br>speed: 30<br>horizontal_move_z: 5<br>mesh_min: 1, 1<br>mesh_max: 110, 110<br>probe_count: 5, 5<br><br>[delayed_gcode bed_mesh_init]<br>initial_duration: .01<br>gcode:<br> BED_MESH_PROFILE LOAD=default|`
You will need to check what [config is loaded on the PZ](https://e3d-online.com/pages/e3d-support-pz-probe) when running it. From what i understand its related to the sensitivity of the PZ sensor. Im pretty sure im using the second preset.
## Testing[](https://fattylewis.com/2025/01/15/adding-the-e3d-pz-probe-to-a-voron-v0-2/#testing)
Make sure you testing this before just cracking on and printing. Its simple to check, just do the endstop tests in mainsail while tapping the end of the hotend to make sure it triggers. As this is all happens really quick i kept tapping it while rechecking the endstop status.
## End[](https://fattylewis.com/2025/01/15/adding-the-e3d-pz-probe-to-a-voron-v0-2/#end)
You should be good to try running a bed mesh now. The printer config provided also tells the printer to load the bed mesh “default”. You can just change the name if you want or name your bed mesh “default”. I am by no means an expert on this, in fact ive just muddled my way through this. Any criticism welcome!# Markdown syntax guide