#prusawire #3dprinting
*Ask in the Positron3D Discord in #prusawire-discussions for help with your build!*
## Resources
- [Voron Software Installation Guide](https://docs.vorondesign.com/build/software/) for some good resources on Mainsail (Klipper on Raspberry Pi) and Control Board firmware.
- [Raspberry Pi OS based \| MainsailOS](https://docs-os.mainsail.xyz/getting-started/raspberry-pi-os-based)
- [Welcome to Mainsail \| Mainsail](https://docs.mainsail.xyz/)
- [GitHub - bigtreetech/BIGTREETECH-SKR-mini-E3](https://github.com/bigtreetech/BIGTREETECH-SKR-mini-E3)
- [BIGTREETECH-SKR-mini-E3/firmware/V3.0/Klipper at master · bigtreetech/BIGTREETECH-SKR-mini-E3 · GitHub](https://github.com/bigtreetech/BIGTREETECH-SKR-mini-E3/tree/master/firmware/V3.0/Klipper)
## Configuration
Start with the [Positron3D Prusawire Configuration](https://github.com/Positron3D/prusawire-klipper-config) settings and profiles.
More detail general instructions are found at [Software Configuration \| Voron Documentation](https://docs.vorondesign.com/build/software/configuration.html).
### Sensorless Homing
If you are running the Einsy board, congrats, you are now done.
For the BTT SKR Mini E3, some further tuning likely needs to happen. Refer to [this guide](https://gist.github.com/clee/9108f7717defce8b1222698f816def0a#finding-the-right-stallguard-threshold) by clee on setting the correct stallguard threshold.
### Input Shaper
Some defaults have been provided, but they are no doubt unsuitable for your exact machine. We recommend installing [ShakeTune](https://github.com/Frix-x/klippain-shaketune) for measuring resonances, and reading the [Klipper guide](https://www.klipper3d.org/Measuring_Resonances.html#max-smoothing) on understanding which value to choose.
**Y Axis Input Shaping**: This requires an external accelerometer (eg LDO Input Shaper) to be mounted to your heated bed.
## Build Log - "THOTH STATION"
*This is a running log of what I've done for my Prusawire PW.0011. It may or may not all apply to your build / setup.*
- Mainsail
- Grab latest Raspberry Pi imager from: [Raspberry Pi software – Raspberry Pi](https://www.raspberrypi.com/software/)
- Run pi-imager
- 128GB Samsung Pro Endurance microSD Card
- Pi 4
- Mainsail OS
- Settings
- Hostname: {HOSTNAME_HERE}
- Username: {USERNAME}
- Password: {1PASSWORD}
- WiFi: {WIFI_SSID} / password
- WLAN Country = US
- Time Zone: America/New_York
- Enable SSH
- Write image to microSD card
- Inserted microSD card into Raspberry Pi.
- Turned on printer.
- Klipper on SKR Mini E3 V3
- Insert MicroCenter 16GB microSD Card into Mac.
- Format as FAT32
- `ssh {USERNAME}@{HOSTNAME_HERE}`
- Make the Klipper firmware for the control board:
- `cd ~/klipper/`
- `make menuconfig`
- Select "Enable extra low-level configuration options"
- Microcontroller: "STMicroelectronics STM32"
- Processor Model: "STM32G0B1"
- Bootloader offset: "8KiB bootloader (stm32duino)"
- Clock reference: "8MHz Crystal"
- Communication interface: "USB on PA11/PA12"
- Press Q and then Y to save.
- `make`
- Copy the `klipper.bin` from the output directory to your local machine:
- ex: `scp {USERNAME}@{HOSTNAME}:~/klipper/out/klipper.bin ~/`
- Copy the `klipper.bin` to the root of the SD card as `firmware.bin`
- Power off SKR-Mini-E3-V3.0
- Insert microSD Card
- Power on SKR-Mini-E3-V3.0
- Confirm flash was successful by running `ls /dev/serial/by-id` on the Raspberry Pi.[](https://github.com/bigtreetech/BIGTREETECH-SKR-mini-E3/blob/master/firmware/V3.0/Klipper/Images/stm32g0b1_id.png)
- Follow instructions at: [GitHub - Positron3D/prusawire-klipper-config: Prusawire configuration for Klipper](https://github.com/Positron3D/prusawire-klipper-config)
- `cd ~/`
- `git clone https://github.com/Positron3D/prusawire-klipper-config.git ~/printer_data/config/prusawire`
- `cd ~/printer_data/config/`
- Edit `moonraker.conf`:
- Add the following to the end of it:
```
[update_manager prusawire-config]
type: git_repo
primary_branch: main
path: ~/printer_data/config/prusawire
origin: https://github.com/Positron3D/prusawire-klipper-config.git
managed_services: klipper
```
- `cd ~/printer_data/config/prusawire/`
- `cp printer.cfg.example ../printer.cfg`
- `cd ~/printer_data/config/`
- Edit `printer.cfg`:
- Uncomment the correct section for the control board you're using.
- BTT SKR Mini E3 in my case.
- Edit the serial line to use the output from `ls /dev/serial/by-id`
- Uncomment the correct section for the toolhead board you're using.
- LDO Nitehawk SB in my case.
- Edit the serial line to use the output from `ls /deve/serial/by-id`
- Uncomment the correct section for the probe you're using.
- SuperPINDA on Nitehawk SB in my case.
- Uncomment the correct section for the filament sensor you're using.
- LDO Nitehawk SB in my case.
- Under LCD Screens, uncomment the info for the MK3 LCD if using, or add info for BTT HDMI 5:
- For BTT HDMI 5, this section isn't need. The installation of KlipperScreen below is all you need.
- Edit `sensor_type` to be your sensor
- Prusawire Config includes what is probably the correct sensor type for you using Revo.
- For Bambu X1C Hot End in SB:
- `sensor_type: ATC Semitec 104GT-2`
- `max_power_ 0.8`
- Access the Mainsail instance: http://{HOSTNAME_HERE}
- At this point, we should see all the printer controls! Else, fix any errors.
- Klipper Control Panel on the BTT HDMI 5 Display with KlipperScreen
```bash
git clone https://github.com/jordanruthe/KlipperScreen.git
./KlipperScreen/scripts/KlipperScreen-install.sh
```
- Default settings should be fine.
- Sensorless Homing with BTT SKR Mini E3 V3.0
- ** *For the BTT SKR Mini E3, some further tuning likely needs to happen. Refer to [this guide](https://gist.github.com/clee/9108f7717defce8b1222698f816def0a#finding-the-right-stallguard-threshold) by clee on setting the correct stallguard threshold.*
- **NOTE: For the BKK SKR Mini E3 V3.0 --> must put jumpers on X-STOP and Y-STOP to allow sensorless homing!**
- NOT Z-STOP if you are using the SuperPINDA!
- TMC2209 is used on the SKR Mini E3
- PID Tuning for Hot End:
- In Mainsail, enter the following commands to set the PID Tuning for the Hot End:
- `PID_CALIBRATE heater=extruder TARGET=250`
- `SAVE_CONFIG`
- Results 2025-09-25 @ 1645: `PID parameters: pid_Kp=38.373 pid_Ki=12.182 pid_Kd=30.219`
- PID Tuning for Heat Bed
- In Mainsail, enter the following commands to set the PID Tuning for the Heat Bed:
- `PID_CALIBRATE heater=heater_bed TARGET=65`
- `SAVE_CONFIG`
- Results 2025-09-29 @ 1400: `PID parameters: pid_Kp=49.793 pid_Ki=0.712 pid_Kd=870.137`
- ==TODO: FILAMENT RUNOUT SENSOR==
- See [[Prusawire Software Installation and Configuration#Filament Runout Sensor]] for hardware setup.
- Configuration Info for filament runout sensor if using.
- NEOPIXEL Stealthburner Configuration for Rainbow Barf LED
- See below [[Prusawire Software Installation and Configuration#Rainbow Barf LED Hardness - Neopixel]]
- ==**TODO: Input Shaper:**== *Some defaults have been provided, but they are no doubt unsuitable for your exact machine. We recommend installing [ShakeTune](https://github.com/Frix-x/klippain-shaketune) for measuring resonances, and reading the [Klipper guide](https://www.klipper3d.org/Measuring_Resonances.html#max-smoothing) on understanding which value to choose.*
- ==**TODO: Y-Axis Input Shaping:**== *This requires an external accelerometer (eg LDO Input Shaper) to be mounted to your heated bed.*
### BTT SKR Mini E3 V3.0 Control Board
![[Pasted image 20250925155457.png]]
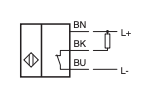
## SuperPINDA Probe
Brown = +5V
Blue = GND
Black = Signal
### NiteHawb-SB
Make sure there isn't a "!" in the superpinda config or it won't work.
```
[probe]
pin: ^nitehawk:gpio13
```
On NiteHawk-SB, use the XY Endstop Port. Connect Black(Signal) to GPIO13.
![[Pasted image 20250926161441.png|500]]
### SB2209 USB
[EBB SB2209 USB V1.0 - BIGTREETECH WIKI](https://bttwiki.com/EBB%20SB2209%20USB.html)
Use the PROBE port (5-pin)
![[Pasted image 20250928133755.png|500]]
### SB2209 CAN
Use the sample SB2209 USB config provided and change the pin to be a CANbus pin:
This will vary based on what your probe input pin is...
`pin: EBBCan: PB5`
![[Pasted image 20250928140517.png]]
![[Pasted image 20250928134924.png|300]]
![[Pasted image 20250928134902.png|500]]
### Rainbow Barf LED Hardness - Neopixel
SB Rainbow Barf Config to include at the end of the toolboard config (`ldo_nighthawk_sb.cfg` in my case)
[whopping\_Voron\_mods/LEDs/Rainbow\_Barf\_Logo\_LED/Code/stealthburner\_led\_effects\_barf.cfg at main · tanaes/whopping\_Voron\_mods · GitHub](https://github.com/tanaes/whopping_Voron_mods/blob/main/LEDs/Rainbow_Barf_Logo_LED/Code/stealthburner_led_effects_barf.cfg)
**Install the Klipper-LED-Effects Plugin**
[BARF-Led-Kit/stealthburner\_leds.cfg at main · 3DPTronics/BARF-Led-Kit · GitHub](https://github.com/3DPTronics/BARF-Led-Kit/blob/main/stealthburner_leds.cfg) + [GitHub - julianschill/klipper-led\_effect: LED effects plugin for klipper](https://github.com/julianschill/klipper-led_effect)
```bash
cd ~
git clone https://github.com/julianschill/klipper-led_effect.git
cd klipper-led_effect
./install-led_effect.sh
```
### Filament Runout Sensor
- Omron D2F-5L Switch
- [Digikey Omron D2F-5L Switch](https://www.digikey.com/en/products/detail/omron-electronics-inc-emc-div/D2F-5L/8593137)
- 5.5mm Stainless Steel Ball Bearing
- [Amazon.com: uxcell 50pcs 5.5mm 304 Stainless Steel Bearing Balls G100 Precision : Industrial & Scientific](https://www.amazon.com/dp/B09DSH1GL6?ref=ppx_yo2ov_dt_b_fed_asin_title)
If using NiteHawk-SB, can combine with the SuperPINDA JST connector to grab 5VDC, GND, and the otherwise unused GPIO12 pin.
### ShakeTune - Input Shaping
Usage Documentation: [klippain-shaketune/docs/README.md at main · Frix-x/klippain-shaketune · GitHub](https://github.com/Frix-x/klippain-shaketune/blob/main/docs/README.md)
1. Be sure to have a working accelerometer on your machine and a `[resonance_tester]` section defined. You can follow the official [Measuring Resonances Klipper documentation](https://www.klipper3d.org/Measuring_Resonances.html) to configure it.
2. Install Shake&Tune by running over SSH on your printer:
```shell
wget -O - https://raw.githubusercontent.com/Frix-x/klippain-shaketune/main/install.sh | bash
```
3. Then, append the following to your `printer.cfg` file and restart Klipper:
```
[shaketune]
# result_folder: ~/printer_data/config/ShakeTune_results
# Path where the processed results will be stored. If the folder doesn't exist,
# it will be automatically created. You can change this if you'd like to store
# results in a different location.
# number_of_results_to_keep: 10
# This setting defines how many results you want to keep in the result folder.
# Once the specified number is exceeded, older results will be automatically deleted
# to free up space on the SD card and avoid cluttering the results folder.
# keep_raw_data: False
# If set to True, Shake&Tune will store both the processed graphs and the raw accelerometer
# .stdata files in the results folder. This can be useful for debugging or archiving purposes.
# Please always attach them when reporting any issues on GitHub or Discord.
# show_macros_in_webui: True
# Mainsail and Fluidd doesn't create buttons for system commands (macros that are not part
# of the printer.cfg file). This option allow Shake&Tune to inject them into the webui at runtime.
# If set to False, the macros will be hidden but still accessible from the console by typing
# their names manually, which can be useful if you prefer to encapsulate them into your own macros.
# timeout: 600
# This defines the maximum processing time (in seconds) to allows to Shake&Tune for generating
# graphs from a .stdata file. 10 minutes should be more than enough in most cases, but if you have
# slower hardware (e.g., older SD cards or low-performance devices), increase it to prevent timeouts.
# measurements_chunk_size: 2
# Each Shake&Tune command uses the accelerometer to take multiple measurements. By default,
# Shake&Tune will write a chunk of data to disk every two measurements, and at the end of the
# command will merge these chunks into the final .stdata file for processing. "2" is a very
# conservative setting to avoid Klipper Timer Too Close errors on lower end devices with little
# RAM, and should work for everyone. However, if you are using a powerful computer, you may
# wish to increase this value to keep more measurements in memory (e.g., 15-20) before writing
# the chunk and avoid stressing the filesystem too much.
# max_freq: 200
# This setting defines the maximum frequency at which the calculation of the power spectral density
# is cutoff. The default value should be fine for most machines and accelerometer combinations and
# avoid touching it unless you know what you're doing.
# dpi: 300
# Controls the resolution of the generated graphs. The default value of 300 dpi was optimized
# and strikes a balance between performance and readability, ensuring that graphs are clear
# without using too much RAM to generate them. Usually, you shouldn't need to change this value.
```